金数据技术博客 · №7
CKEditor5食用指南
CKEditor5简介
CKEditor 5 可以提供任何WYSIWYG(所见即所得)类型的编辑器。从类似于 Google Docs 和 Medium 的在线编辑器,到类似于 Slack 或 Twitter 的应用程序,CKEditor 5 编辑框架为每个用户提供了定制的和开箱即用的解决方案。这个具有 MVC 架构、自定义数据模型和虚拟 DOM 的现代 JavaScript 富文本编辑器是在 ES6 中重新开始编写的,具有出色的 webpack 支持。
编辑器类型
引入方式
官方
优势:创建方便,能及时使用官方最新更新。
缺陷:第一种的定制化程度不高,第二种配置复杂,且插件ck5相关的插件代码会耦合到应用项目里。
我们项目的引入方式
我们项目中使用,包括数据模型、插件交互、细节样式等都需要极高的定制化,且需要良好的代码隔离,理想方向是构建出来的ck5插件能用于我们的多个项目中且保持统一。
上述两种方式都不能很好的满足我们的需求,于是我们进行了:
CKEditor5框架介绍
由核心编辑器框架、编辑引擎、UI库组成
核心编辑器框架 Core editor architecture
@ckeditor/ckeditor5-core ,由以下几个部分组成。
编辑器类 Editor Classes
该类Editor代表编辑器的基础。它是应用程序的入口点,粘合所有其他组件。它提供了一些您需要了解的属性:
- config– 配置对象。
- plugins和commands– 加载的插件和命令的集合。
- model–编辑器数据模型的入口点。
- data– 数据控制器。它控制如何从文档中检索数据并在其中设置数据。
- editing– 编辑控制器。它控制如何将模型呈现给用户进行编辑。
- keystrokes– 击键处理程序。它允许将击键绑定到动作。
除此之外,编辑器还公开了一些方法:
- create()– 静态create()方法。编辑器构造函数受到保护,您应该使用此静态方法创建编辑器。它允许初始化过程是异步的。
- destroy()– 销毁编辑器。
- execute()– 执行给定的命令。
- setData()–getData()一种从编辑器中检索数据并在编辑器中设置数据的方法。数据格式由数据控制器的数据处理器控制,它不需要是字符串(如果您实现这样的数据处理器,它可以是例如 JSON )。例如,请参阅如何生成 Markdown 输出。
插件 Plugins
- 每个功能都由插件实现或至少启用。
- 插件是高度精细的。
- 插件对编辑器了如指掌。
- 插件应该尽可能少地了解其他插件。
命令 Commands
命令是动作(回调)和状态(一组属性)的组合。
所有命令都需要从Command类继承。需要将命令添加到编辑器的命令集合中,以便使用该Editor#execute()方法执行它们。
示例:
class MyCommand extends Command {
    execute( message ) {
        console.log( message );
    }
}

class MyPlugin extends Plugin {
    init() {
        const editor = this.editor;

        editor.commands.add( 'myCommand', new MyCommand( editor ) );
    }
}
调用editor.execute( 'myCommand', 'Foo!' )将打印Foo!到控制台。
事件系统和可观察对象 Event system and observables
CKEditor 5 具有基于事件的架构,因此您可以在任何地方查找EmitterMixin和ObservableMixin混合。这两种机制都允许解耦代码并使其可扩展。
大多数已经提到的类要么是发射器,要么是可观察的(可观察的也是发射器)。发射器可以发出(触发)事件并监听它们。
class MyPlugin extends Plugin {
    init() {
        // Make MyPlugin listen to someCommand#execute.
        this.listenTo( someCommand, 'execute', () => {
            console.log( 'someCommand was executed' );
        } );

        // Make MyPlugin listen to someOtherCommand#execute and block it.
        // You listen with a high priority to block the event before
        // someOtherCommand's execute() method is called.
        this.listenTo( someOtherCommand, 'execute', evt => {
            evt.stop();
        }, { priority: 'high' } );
    }

    // Inherited from Plugin:
    destroy() {
        // Removes all listeners added with this.listenTo();
        this.stopListening();
    }
}
第二个监听器'execute'展示了 CKEditor 5 代码中非常常见的做法之一。
除了用事件装饰方法外,可观察对象还允许观察它们选择的属性。例如,Command该类通过调用使其成为#value可#isEnabled观察的set():
class Command {
    constructor() {
        this.set( 'value', undefined );
        this.set( 'isEnabled', undefined );
    }
}

mix( Command, ObservableMixin );

const command = new Command();

command.on( 'change:value', ( evt, propertyName, newValue, oldValue ) => {
    console.log(
        `${ propertyName } has changed from ${ oldValue } to ${ newValue }`
    );
} )

command.value = true; // -> 'value has changed from undefined to true'
Observables 还有一个被编辑器广泛使用的特性(尤其是在 UI 库中)——将一个对象的属性值绑定到其他一些属性的值或(一个或多个对象的)属性值的能力。当然,这也可以通过回调来处理。
假设target和source是可观察的并且使用的属性是可观察的:
target.bind( 'foo' ).to( source );

source.foo = 1;
target.foo; // -> 1

// Or:
target.bind( 'foo' ).to( source, 'bar' );

source.bar = 1;
target.foo; // -> 1
编辑引擎 Editing engine
MVC架构
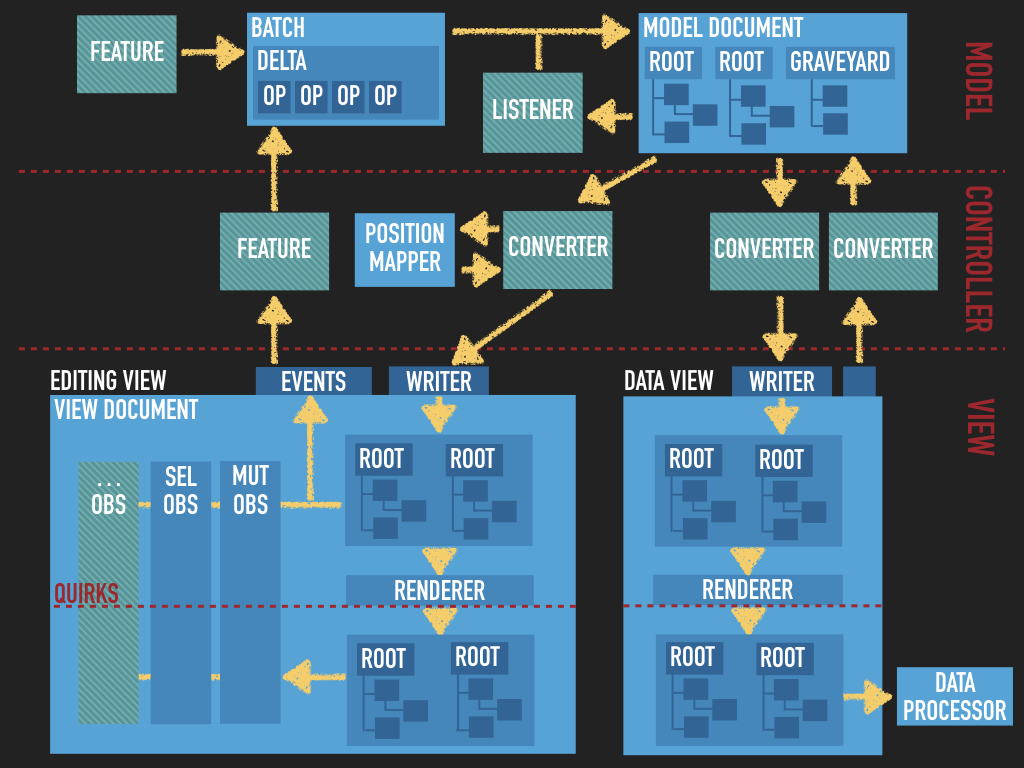
三层:模型、控制器和视图。有一个模型文档被转换为单独的视图——编辑视图 Editing view和数据视图 Data view。这两个视图分别代表用户正在编辑的内容(您在浏览器中看到的 DOM 结构)和编辑器输入和输出数据(以插入的数据处理器可以理解的格式)。两个视图都具有虚拟 DOM 结构(自定义的类似 DOM 的结构),转换器和功能在其上工作,然后渲染到 DOM。
绿色块是编辑器功能(插件)引入的代码。这些功能控制对模型进行哪些更改,如何将它们转换为视图以及如何根据触发的事件(视图和模型的事件)更改模型。
由于此部分内容太多,接下来的内容只用部分实现代码来描述这三层, 详细文档请参阅Editing engine
模型 Model
定义一个模型:
const schema = this.editor.model.schema;
schema.register( 'stock', {
	allowWhere: '$text',
	isInline: true,
	isObject: true,
	allowAttributes: [ 'code', 'type' ]
} );
在编辑器的model.schema中注册该模型, 包含了基础属性和接受的属性, 详细的属性含义参见schema文档
视图 View
分为编辑视图Editing view 和数据视图Data view。
简单来说,编辑视图是编辑富文本时用户看到并可以编辑的 DOM。数据视图editor.getData()调用或editor.setData()得到或使用的富文本内容。
editor.editing;                 // The editing pipeline (EditingController).
editor.editing.view;            // The editing view's controller.
editor.editing.view.document;   // The editing view's document.
editor.data;                    // The data pipeline (DataController).
转换 Conversion
连接模型和视图。
数据向上转换
将数据加载到编辑器。
// Data View -> Model
conversion.for( 'upcast' )
	.elementToElement( {
		view: {
			name: 'img',
			attributes: {
				'data-img-role': 'stock'
			}
		},
		model: ( viewElement, { writer } ) => {
			const code = viewElement.getAttribute( 'data-stock-code' );
			const type = viewElement.getAttribute( 'data-stock-type' );
			return writer.createElement( 'stock', {
				code, type
			} );
		}
		// converterPriority: 'high'
	} );
数据向下转换
从编辑器中检索数据。
// Model -> Data view
conversion.for( 'dataDowncast' )
	.elementToElement( {
		model: 'stock',
		view: createStockView
	} );

// Create view for data
function createStockView( modelItem, { writer } ) {
	const code = modelItem.getAttribute( 'code' );
	const type = modelItem.getAttribute( 'type' ) || 'min';
	const stockView = writer.createContainerElement( 'img', {
		'data-img-role': 'stock',
		'data-stock-type': type,
		'data-stock-code': code,
		src: judgeSrc( code, type )
	} );

	return stockView;
}
编辑向上转换
将编辑器内容呈现给用户进行编辑。
// Model -> Editing View (element)
conversion.for( 'editingDowncast' )
	.elementToElement( {
		model: 'stock',
		view: ( modelItem, { writer } ) => {
			const widgetElement = createStockEditingView( modelItem, writer );
			return toWidget( widgetElement, writer, 'span' );
		}
	} );

// Create view for editor
function createStockEditingView( modelItem, writer ) {
	const stockCode = modelItem.getAttribute( 'code' );
	const type = modelItem.getAttribute( 'type' ) || 'min';
	const stockView = writer.createContainerElement( 'img', {
		src: judgeSrc( stockCode, type )
	} );

	return stockView;
}
以上代码就简单实现了我们 data view -> model -> editing view -> data view 的转换, 更多的conversion内容请参阅conversion 文档
UI 库
CKEditor 5 的标准 UI 库是@ckeditor/ckeditor5-ui. 它提供了允许构建与生态系统的其他组件无缝集成的模块化 UI 的基类和助手。详细的UI创建和通用UI组件请参阅UI library,这里只讲述几个通用组件的基础用法。
使用 LabeledInputView 创建一个input:
this.stockInputView = this._createStockInput()
_createStockInput() {
		const t = this.locale.t;

		// Create equation input
		const stockInput = new LabeledInputView( this.locale, InputTextView );
		const inputView = stockInput.inputView;
		stockInput.infoText = t( '请输入股票代码' ); // 提示信息

		const onInput = () => {
			if ( inputView.element != null ) {
				const stockInput = inputView.element.value.trim();

				this.saveButtonView.isEnabled = !!stockInput;
			}
		};

		inputView.on( 'render', onInput );
		inputView.on( 'input', onInput );

		return stockInput;
	}
获取input的值
get code(){
        return this.stockInputView.inputView.element.value
}
校验值、清空报错信息
validate(){
        const maxLength = 8;
        if( this.code.length > maxLength ) {
                this.stockInputView.errorText = '代码长度不正确';
        }
}

resetFormStatus() {
        this.stockInputView.errorText = null;
}
CKEditor5提供很好的UI规范,很多组件都可以直接拿来使用, 如果要自定义组件,请尽量遵循CKEditor5的设计规范,尽量使用CSS变量。
我们如何开发一个CKEditor5插件
运行本地开发服务器
git clone git@matrix.jinshuju.co:engineering/jinshuju/editorx.git
cd editorx
yarn
cd packages/ckeditors-build-classic
yarn start
tips: 在根目录安装依赖,避免插件版本冲突。
文件结构
ckeditor5-xxx //xxx为插件名
│   README.md
│
└───docs //文档
│
│
└───lang //多语言文件
│
│
└───src
│   │
│   │   xxxediting.js //定义model 及转换
│   │   xxxcommand.js //定义command
│   │   xxxui.js //关联ui
│   │
│   └───view //视图文件
│
│
└───theme //样式文件、icons
代码示例
总结
CKEditor5 本身拥有良好且完善的规范, 在这套规范的基础上我们能很快的上手开发和维护插件, 由于其良好的通用性,我们可以开发更多有趣的或者实用的插件共享到开源社区。